If you have spent any time creating an Infor Birst dashboard I would bet that you have spent hours...
In this article, we will be discussing how to embed a filter onto a Birst dashboard. Filters are typically added to a dashboard in a drawer, but embedded filters take a filter and embed it directly onto the page, allowing the user to select filters without opening a drawer.
Key Takeaways
- Embedded filters allow users to select filters without opening a drawer
- To add an embedded filter, select "insert embedded filter" and choose which filter to embed
- Customizing the title of the filter can make it clearer for users.
Navigating to the Dashboard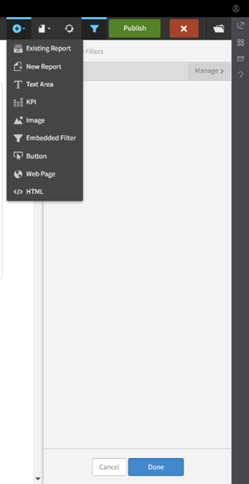
To embed a filter onto a dashboard, we need to navigate to the dashboard that we want to work with. Once we are on the dashboard, we can add the filter by embedding it directly onto the page.
Typically, filters are added to a dashboard in a drawer. When a user clicks on the filter icon, a drawer pops open with a list of filters that the viewer can apply to the dashboard. However, embedded filters take a filter and embed it directly onto the page.
To add an embedded filter, we first need to close the drawer. Then, we can click on "Insert Embedded Filter" and select "Choose Select Filter" to pick the filter we want to embed onto the dashboard. In this case, we select "Product Category" and click "Done".
The filter is now embedded directly onto the dashboard. To make it more clear for the viewer, we can change the title by clicking "Edit" and selecting "Dashlet Properties". We turn on the title and name it "Product Category Filter" before clicking "Save".
Now that the filter is on the dashboard, users can simply select it instead of opening the drawer. That is how we add an embedded filter to a Birst dashboard.
Understanding the Filter Drawer
When adding filters to a dashboard, it is important to note that they are typically added to a drawer. This means that when a user clicks on the filter icon, a drawer will pop open with a list of filters that the viewer can apply to the dashboard.
However, embedded filters are different. They take a filter and embed it directly onto the page. To add an embedded filter, we first need to close the filter drawer and then select "Insert Embedded Filter."
Once we have the embedded filter on our dashboard, we can choose which filter we want to embed by selecting "Choose Select Filter" and picking the desired filter. For example, we might choose "Product Category."
After selecting the filter, we can further customize it by changing the title. To do this, we can click "Edit," choose "Dashlet Properties," and turn on the title option. We might name it "Product Category Filter" to add clarification for viewers.
Now that the filter is embedded directly onto the dashboard, users can simply select it instead of opening the filter drawer. This is a convenient way to streamline the user experience and make it easier for viewers to interact with the dashboard.
Inserting an Embedded Filter
To embed a filter onto a dashboard, we need to follow a few simple steps. First, we navigate to the dashboard we want to work with. Filters are typically added to a dashboard in a drawer, but embedded filters are different. They take a filter and embed it directly onto the page.
To insert an embedded filter, we need to close the drawer and click on the "Insert Embedded Filter" button. This will add the embedded filter onto the dashboard. We will then be prompted to pick a filter. We can select "Choose Select Filter" and pick the filter we want to embed onto the dashboard. In this example, we will choose "Product Category" and click "Done".
Once we have embedded the filter, we may want to change its title to make it more clear for the viewer. To do this, we can click "Edit" and choose "Dashlet Properties". We can then turn on the title and provide a descriptive name like, “Product Category”. Finally, we click "Save" and notice that the filter is now embedded directly onto the dashboard.
By adding an embedded filter, our users can simply select the filter they want to apply, instead of opening the drawer. This makes it easier and more efficient for them to interact with the dashboard.
Selecting a Filter to Embed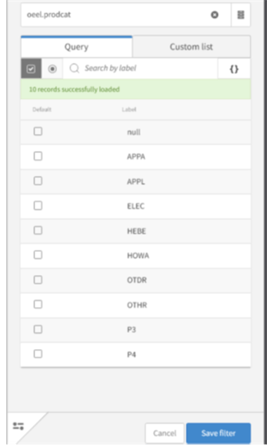
When embedding a filter onto a dashboard, it is important to note that filters are typically added to a dashboard in a drawer. This means that when a user clicks the filter icon, a drawer pops open with a list of filters that the viewer can apply to the dashboard. However, embedded filters take a filter and embed it directly onto the page.
To embed a filter onto a dashboard, we first need to close the drawer and then select "Insert Embedded Filter." This will prompt us to pick a filter to embed onto the dashboard. We can simply select "Choose Select Filter" and then pick which one we want to embed onto the dashboard. In this case, we will select "Product Category" and click "Done."
Once we have embedded the filter onto the dashboard, we can make additional changes. For example, we might want to change the title of the filter to make it more clear for the viewer. To do this, we can click "Edit" and choose "Dashlet Properties." From there, we can turn on the title and name it "Product Category Filter" before clicking "Save."
Now that the filter is embedded directly onto the dashboard, our users can simply select it instead of opening the drawer. This is a simple and effective way to make filters more accessible and user-friendly.
Editing the Filter Title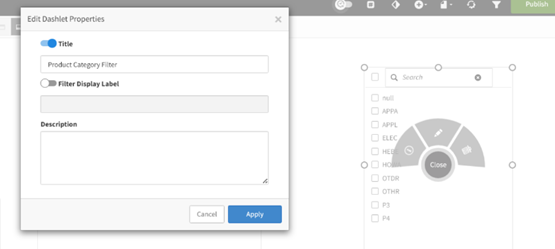
To edit the title of an embedded filter on a dashboard, we first need to insert the embedded filter onto the page. This can be done by closing the filter drawer and selecting "Insert Embedded Filter." Once the filter is on the dashboard, we can choose which filter we want to embed by selecting "Choose Select Filter" and picking the desired filter, such as "Product Category."
To change the title of the filter, we can click "Edit" and then select "Dashlet Properties." From there, we can turn on the title and name it something clear and descriptive for the viewer, such as "Filter" or "Product Category Filter." After naming the filter, we can click "Save" and the new title will be displayed on the dashboard.
Now that the filter is embedded directly onto the dashboard, users can simply select the desired filter option without having to open the filter drawer. This makes it easier and more efficient for users to interact with the dashboard.
Finalizing the Embedded Filter
We have successfully embedded a filter directly onto our dashboard, making it easier for our users to select filters without having to open a drawer. To finalize the embedded filter, we can make a few additional changes to ensure it is clear and easy to use.
First, we can change the title of the embedded filter. To do this, we click on the filter and select "Edit." Then, we choose "Dashlet Properties" and turn on the title option. We can name it "Product Category Filter" to provide clarity for our viewers. After making the changes, we click "Save."
Now, our embedded filter is complete and ready for use. Our users can simply select the filter they want to apply to the dashboard without having to navigate through a drawer. This makes the dashboard more user-friendly and efficient.
Conclusion
We have just demonstrated how to embed a filter directly onto a dashboard. Filters are typically added to a dashboard in a drawer, but embedded filters take a filter and embed it directly onto the page. To add an embedded filter, we simply need to close the drawer and select "insert embedded filter". After selecting the filter, we want to embed, we can customize the title and save our changes. Now, our users can simply select the filter on the dashboard instead of opening the drawer. This is a useful feature for making dashboards more user-friendly and efficient.
Learn at your pace

Dragon Den is an Agile Dragon Group community focused on all aspects of Birst knowledge and development. Whether it is our free content or our paid training, we are here to support you throughout your Birst journey, from building your first dashboard to building your Birst solutions.

- Creating dashboards
- Creating reports
- Adding filters
- Manage user access