In this article, I will demonstrate how to add images to a Birst dashboard. Adding images to a...
In this article, we will explore the process of adding text to a dashboard. This is an essential skill for anyone looking to create professional-looking dashboards. We will cover all the necessary steps, including navigating to the dashboard, defining the text, adjusting font type and size, changing text and background color, and formatting options.
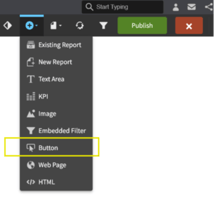
To add text to a dashboard, we simply need to use the plus symbol in the ribbon and choose the text area option. We can then define our text and adjust its appearance as needed. Once the text box is created, we can adjust its size and position on the dashboard, and easily edit it at any time. With these simple steps, we can create engaging and informative dashboards that effectively convey our data.
Key Takeaways
- Adding text to a dashboard is a simple process that involves defining the text and adjusting its appearance.
- We can easily format our text by changing its font type and size, color, and alignment.
- Text boxes can be resized and repositioned on the dashboard and edited at any time.
Navigating to Dashboard
To add text to a dashboard, we must first navigate to the dashboard we want to edit. We can do this by going to the "Birst" section and selecting the desired dashboard. Once we are on the dashboard, we can begin adding text by using the plus symbol in the ribbon and selecting "Text Area."
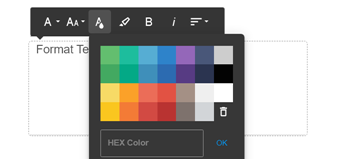
Defining our text is simple - we can just type in the text we want to display. We can then adjust the font type, font size, text color, background color, and even the alignment of the text. If we want to make the text bold or italicized, we can easily do so.
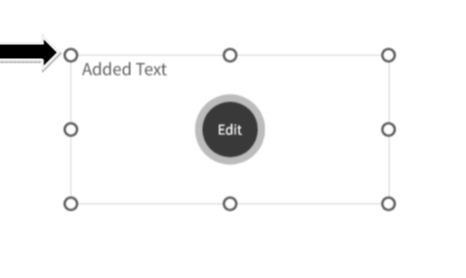
Once we have created our text box, we can adjust its size and move it to any location on the dashboard. To edit the text at any point, we simply click on the text box and select "Edit." Overall, adding text to a dashboard is a straightforward process that can be accomplished with ease.
Adding Text to Dashboard
To start, we navigate to the dashboard we want to work on and use the plus symbol in the ribbon to choose the text area. From there, we define our text by typing in the desired text.
Once the text is entered, we can adjust various formatting options such as font type, font size, text color, and background color. We can also make the text bold, italicize it, or align it as needed.
Like other dashlets, we can adjust the size of the text box and move it to any location on the dashboard. If we need to edit the text at any point, we simply click "edit" and make the necessary changes.
Overall, adding text to a dashboard is a straightforward process that involves creating a text box and customizing it to fit our needs.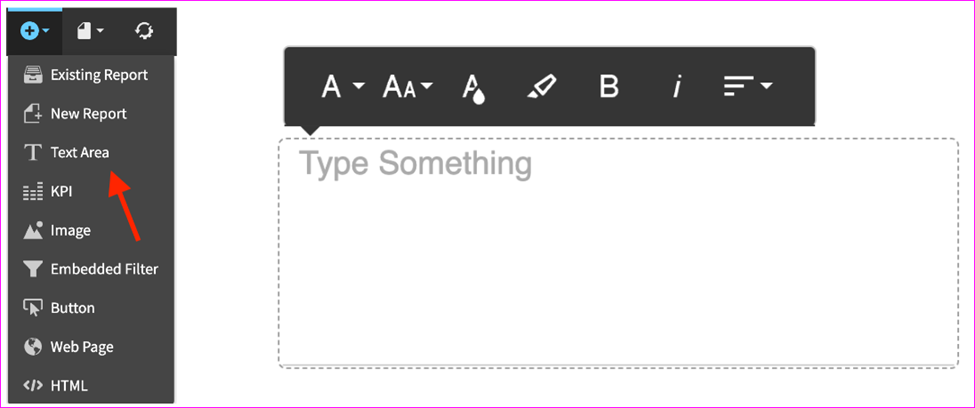
Defining Text
Adding text to a dashboard is a simple process. To do so, we need to use the plus symbol in the ribbon and select the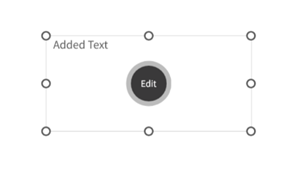 text area option. Once selected, we can define our text by typing it in the designated area.
We can customize the appearance of our text by adjusting the font type, font size, text color, and background color. We can also make our text bold, italicized, or align it to our preference.
If we need to edit our text at any point, we can simply click on the text box and select the edit option. We can then make any necessary changes to our text.
Like other dashlets, we can adjust the size of our text box and move it to any location on the dashboard. There is no magic involved in adding text to a dashboard, it is a very simple process.
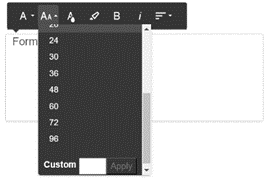
Adjusting Font Type and Size
 Adding text to a dashboard is a straightforward process. First, we navigate to the plus symbol in the ribbon and select the text area. From there, we can define our text by typing it in. This can be done by entering any text into the text box.
Once we have entered our text, we can adjust the font type, font size, text color, and background color. We can also make the text bold, italicized, or aligned.
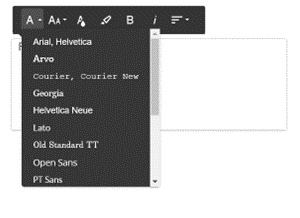
To adjust the font type and size, we simply click on the text box and use the text editor. This is similar to any text editor that you might have encountered. We can make the text larger or smaller, and we can choose from a variety of font types.
If we need to edit the text box at any point, we can simply click on it and select edit. This will allow us to make any necessary changes to the text.
Overall, adjusting the font type and size in a text box is a simple process that can be done quickly and easily.
Changing Text and Background Color
 In this section, we will demonstrate how to change the text and background color of a text box in a dashboard. To add text, we simply use the plus symbol in the ribbon and choose "Text Area." Then, we define our text. For example, we can type "Enter text here."
Once we have added our text, we can adjust its appearance. We can change the font type, font size, text color, and background color. We can also make the text bold or italicized and align it as desired.
To edit the text box, we simply click on it and adjust its size. We can then move it and place it anywhere we like. If we need to edit the text at any point, we can simply click "Edit" and make the necessary changes.
Overall, changing the text and background color of a text box is a simple and straightforward process that can be done quickly and easily in any dashboard.
Text Formatting Options
To add text to a dashboard, we simply need to use the plus symbol in the ribbon and choose the text area option. Once we define our text, we can adjust the font type, font size, text color, background color, and even make it bold or italicized. We can also align the text as needed.
After creating the text box, we can adjust its size and move it to any location on the dashboard. If we need to amend the text later, we can simply click on the box and select the edit option.
Overall, adding text to a dashboard is a simple process that allows us to customize our dashboard and convey information in a clear and visually appealing way.
Adjusting Text Box Size
 When adding text to a dashboard, we can adjust the size of the text box to fit our needs. To do this, we simply need to click on the text box and adjust its size by dragging the edges. We can then move the text box to any location on the dashboard.
Additionally, we can customize the text box by adjusting the font type, font size, text color, and background color. We can also make the text bold or italicized and align the text as needed.
If we need to edit the text box at any point, we can simply click on it and select the edit option. This allows us to make any necessary changes to the text box.
Overall, adjusting the size of a text box is a simple and straightforward process that allows us to customize our dashboard to our specific needs.
Positioning Text Box
In this section, we will demonstrate how to add a text box to a dashboard. To do so, we simply need to use the plus symbol in the ribbon and select the text area option. We can then define our text by typing in the desired content.
Once we have entered our text, we can adjust its appearance, including font type, font size, text color, background color, boldness, italics, and text alignment. This gives us full control over the look and feel of the text box.
After creating the text box, we can easily move it to any location on the dashboard by clicking on it and adjusting its size. We can then place it wherever we want.
If we need to edit the text box at any point, we can simply click on it and select the edit option. This allows us to make any necessary changes to the text.
Overall, adding and positioning text boxes is a simple and straightforward process that can enhance the effectiveness of a dashboard.
Editing Text Box
In this session, we will show you how to add text to your dashboard. To begin, navigate to the dashboard you want to work on and use the plus symbol in the ribbon to add a text area. Once you have added the text area, you can define your text by typing in the box.
Just like any text editor, you can adjust the font type, font size, text color, and background color. You can also make the text bold, italicized, or align the text as needed.
Once you have finished creating your text box, you can adjust its size and move it anywhere on the dashboard. If you need to edit the text box at any point, simply click on the edit button.
Overall, adding and editing text boxes is a simple process that can enhance the visual appeal and functionality of your dashboard.
Learn at your pace

Dragon Den is an Agile Dragon Group community focused on all aspects of Birst knowledge and development. Whether it is our free content or our paid training, we are here to support you throughout your Birst journey, from building your first dashboard to building your Birst solutions.

- Creating dashboards
- Creating reports
- Adding filters
- Manage user access