Dashboards - Adding new and existing reports
Dashboards - Add Buttons
We will be discussing how to add buttons to a Birst dashboard. Adding buttons to a dashboard can greatly enhance user experience and make navigating between dashboards easier.
To add a button, we first need to navigate to the dashboard we want to add the button to. Once we have accessed the dashboard, we can use the insert button in the upper ribbon and choose the button option. From there, we can give the button a title and define where the user is sent to when they click the button. We can navigate to another dashboard or an external URL, and we can also specify parameters to pass. Once we have made all the necessary changes, we can publish the dashboard.
Key Takeaways
- Adding buttons to a dashboard can greatly enhance user experience.
- To add a button, access the dashboard and use the insert button to choose the button option.
- Define where the user is sent to when they click the button, specify parameters to pass if necessary, and publish the dashboard once all changes are made.
Accessing the Dashboard
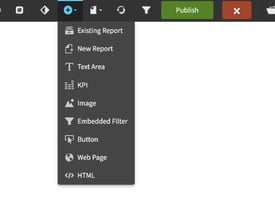
To begin, we need to navigate to the dashboard where the new button needs to be added. Like the other elements we have added to the dashboard, we will start by using the insert button in the upper ribbon and selecting "Button."
When adding a button, the first step is to provide a title. We will title this button "Click Here to Go to the Details Dashboard." The text will automatically adjust to fit the size of the dashlet.
Next, we need to define where the user will be sent when they click the button. We will click "Edit" on the dashlet and choose the link icon. From here, we can either have the user navigate to another dashboard or to an external URL outside of our Birst space. If navigating to another dashboard, we can also specify parameters to pass.
For this example, we will simply have the button “send” the user to the practice dashboard. We will click "Apply" and then publish the dashboard, which is the same as clicking "Save."
Adding a button to a dashboard is that simple. With this feature, users can easily navigate between dashboards and access the information they need.
Inserting a Button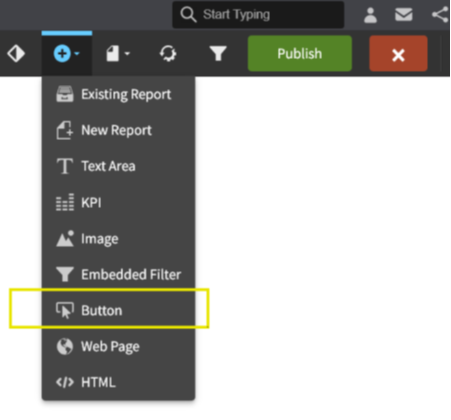
To begin, we navigate to the dashboard we want to modify and use the "insert" button in the upper ribbon. From there, we select "Button" and give it a title. For this example, we will title it "Click here to go to the details dashboard."
When adjusting the size of the dashlet, the text will also increase in size, making it easier to read. Next, we must define where the user is sent when they click the button. We click "edit" on the dashlet and choose the link icon. From there, we can navigate the user to another dashboard or an external URL. If navigating to another dashboard, we can also specify parameters to pass along.
Naming the Button
When adding a button to a Birst dashboard, the first step is to use the insert button in the upper ribbon and select "button". The button will then prompt you to give it a title. For example, we can title the button "Click Here to Go to the Details Dashboard".
.
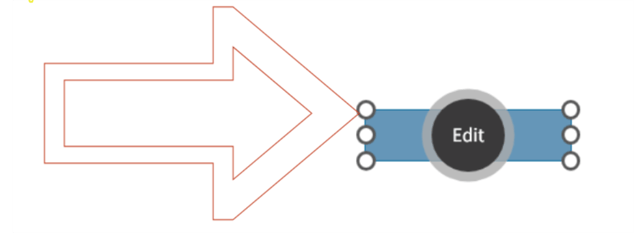
It is important to note that when you move and adjust the size of the dashlet, the text on the button will also increase for better visibility. After naming the button, we need to define where the user is sent to when they click on it. To do this, we click "edit" on the dashlet and use the object handles (the little circles at the corners and in the middle of the top and bottom) of the button to click and drag to make it bigger or smaller.
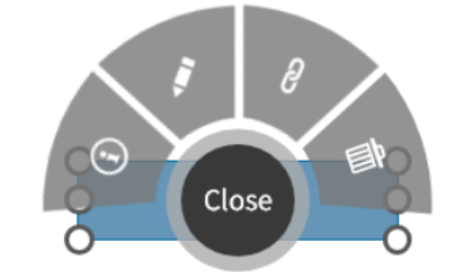
Click on the “pencil”, to name the button
From here, we can choose to have the user navigate to another dashboard or to an external URL outside of the Birst space. If we choose to have the user navigate to another dashboard, we can also specify parameters to pass, such as a user ID or a particular company.
Once we have made our changes, we can publish the dashboard by clicking "save". Adding a button to a Birst dashboard is that simple.
Resizing the Dashlet
To resize a dashlet, first, we need to click on the dashlet to select it. Then, we can click and drag the edges of the dashlet to resize it to our desired size.
It is important to note that when we resize the dashlet, any text or images within the dashlet will also be resized accordingly. This ensures that the dashlet remains visually appealing and easy to read.
If we want to add a button to the dashlet, we can use the insert button in the upper ribbon and choose "button". After giving the button a title, we can adjust the size of the dashlet to ensure that the text is easy to read.
To define where the user is sent when they click the button, we can click "edit" on the dashlet and choose the link icon. From there, we can select whether the user is navigated to another dashboard or an external URL.
If we choose to navigate to another dashboard, we can also specify parameters to pass, such as a user ID or a particular company. This allows for more customized and personalized dashboards.
Once we are done making changes to the dashlet, we can publish the dashboard by clicking "save". Adding a button to a dashlet is a simple and effective way to enhance the functionality and user experience of a dashboard.
Defining Button Destination
To add a button to a Birst dashboard, we first need to go to the dashboard we want to add the button to. Using the insert button in the upper ribbon, we choose "Button" and give it a title. In this case, we will title it "Click here to go to the details dashboard."
Once we have added the button, we need to define where the user will be sent when they click it. To do this, we click "Edit" on the dashlet and choose the “Link icon”. From here, we can choose whether to navigate the user to another dashboard or to an external URL.

Click on the “Link”, to change the destination of the button
If we choose to navigate the user to another dashboard, we can also specify parameters to pass along. For example, we may want to pass along a user ID or a particular company. This can be done by drilling across or sending someone to another dashboard.
Once we have made our changes, we can publish the dashboard by clicking "Save." Adding a button to a Birst dashboard is a simple and effective way to improve user navigation and functionality.
Setting Parameters
To add buttons to a Birst dashboard, we first need to navigate to the dashboard that we want to add the button to. Once we are there, we can use the insert button in the upper ribbon and select "button" from the options. The first thing we need to do is to give the button a title. In our example, we titled it "click here to go to the details dashboard".
After we have given the button a title, we can adjust the size of the dashlet to make the text more visible. We then need to define where the user will be sent when they click the button. To do this, we click "edit" on the dashlet and choose the link icon. We can either have the user navigate to another dashboard or to an external URL somewhere outside of our Birst space.
If we are having a user navigate to another dashboard by clicking on the button, we can also specify parameters to pass. For example, we may want to pass along a user ID or a particular company. It is important to note that when we are drilling across or sending somebody to another dashboard, we can pass parameters as well.
For our example, we simply had the button send the user to the practice dashboard and clicked "apply". Once we are done with our changes, we can publish the dashboard by clicking "save". Adding a button to a dashboard is that simple.
Linking to Another Dashboard
To link to another dashboard, we need to add a button to the current dashboard. We can do this by using the insert button in the upper ribbon and selecting the button option. Once we add the button, the first thing it requires is a title. In this example, we will title the button "click here to go to the details dashboard."
After adding the title, we can adjust the size of the dashlet to make the text more visible. Next, we need to define where the user will be sent when they click the button. To do this, we click on edit on the dashlet and choose the link icon.
From there, we can choose to navigate the user to another dashboard or to an external URL outside of our Birst space. If we choose to navigate to another dashboard, we can also specify parameters to pass along, such as a user ID or a particular company.
In this example, we will simply have the button “send” the user to the practice dashboard. Once we make our changes, we can publish the dashboard by clicking save.
Overall, adding a button to link to another dashboard is a simple process that can enhance the user's experience and provide additional information.
Publishing the Dashboard
We have successfully added a button to our Birst dashboard. Now, we need to publish the dashboard to make the changes visible to others.
To publish the dashboard, we need to save it. We can do this by clicking on the "Save" button located in the upper ribbon. Once we click on the "Save" button, the changes we made to the dashboard will be saved and published.
It is important to note that when we publish the dashboard, the changes we made will be visible to all users who have access to the dashboard. Therefore, we need to make sure that the changes we made are accurate and relevant to the dashboard.
In summary, publishing the dashboard is as simple as clicking on the "Save" button. Once we do this, the changes we made to the dashboard will be saved and visible to all users who have access to the dashboard.
Learn at your pace

Dragon Den is an Agile Dragon Group community focused on all aspects of Birst knowledge and development. Whether it is our free content or our paid training, we are here to support you throughout your Birst journey, from building your first dashboard to building your Birst solutions.

- Creating dashboards
- Creating reports
- Adding filters
- Manage user access