Whether you want to add a new attribute, change the chart type, or make any other adjustments, the...
-
Dashboard notifications are a powerful tool that allows users to schedule the delivery of either an entire dashboard or an individual dashlet. The delivery of the dashboard or report is sent by email, and within the email there is an attachment that will have either the pdf of the dashboard or as an Excel type file. Users are also in control of the frequency of the scheduled notifications and to whom the content is delivered to.
Notifications can be created for an entire dashboard, which contains Reports and KPIs or setup for a specific report. They can determine how frequently the notification should run and can include details such as metadata and any filters that were applied to the detail. For notifications on a dashboard, the only way to deliver that is by a PDF attachment.
Key Takeaways
- Dashboard notifications allow users to schedule the delivery of either an entire dashboard or an individual dashlet.
- Users are in control of how often the dashboard or dashlet is scheduled for delivery, and to whom the dashboard or dashlet is delivered.
- Notifications can be set up at a report level or at the dashboard level.
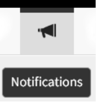
- To set up a notification for an entire dashboard, users click the megaphone icon, add a new notification, give it a name, and define the email address(es) for delivery.
- Notification can be sent to outside users without additional licensing.
Understanding Dashboard Notifications
 Dashboard notifications allow users to schedule the delivery of an entire dashboard or an individual dashlet by email. The email includes an attachment that contains either an image of the dashboard with or the report. Viewers can control the frequency of delivery and to whom the dashboard or dashlet is delivered.
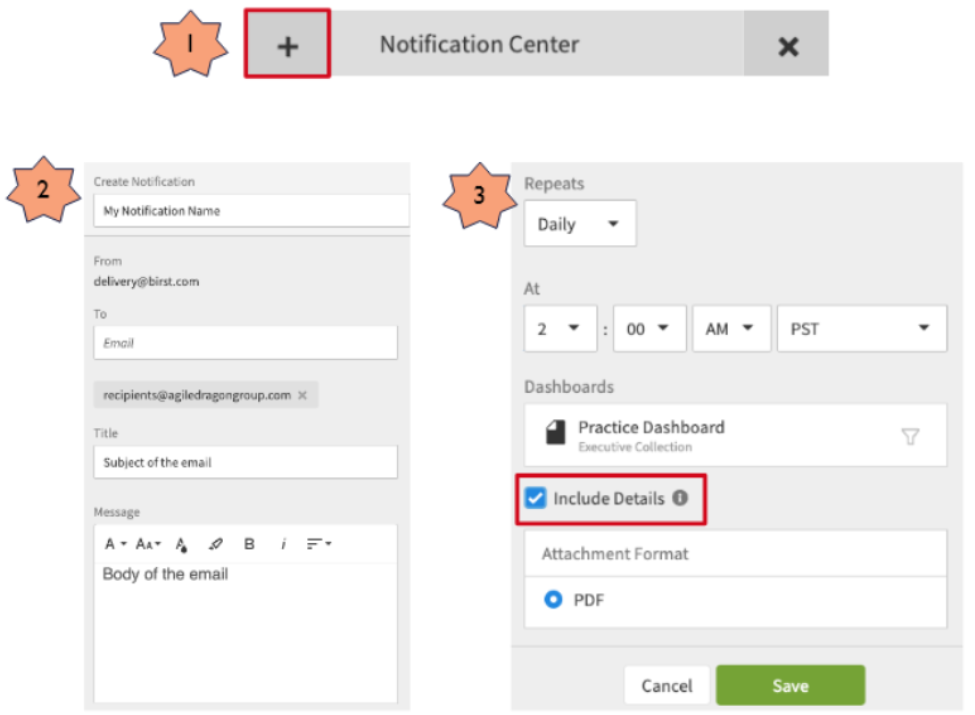
Notifications can be created for a dashboard itself or for an individual report, to get a notification on a KPI, setup a dashboard notification. To set up a notification for an entire dashboard, the viewer must open the dashboard and click on the megaphone icon located on the upper right-hand side. Then, the viewer must click the plus symbol to add a new notification and give it a name. In step two, the viewer must define one or multiple email addresses for delivery and set up the title and message that will become the body and subject line of the email. In step three, the viewer must determine how frequently the notification should run and whether to include details such as metadata and filters.
For notifications of a dashboard, the only way to deliver it is by a PDF attachment. To set up a notification for an individual dashlet, the viewer should hover their cursor over the dashlet and select "create notification" from the dropdown menu. All other steps remain the same, but the viewer can determine the format of the attachment, such as PDF, Excel, or bulk Excel export.
Viewers can manage their own notification schedules by clicking on the megaphone icon and making changes to their notifications using the dropdown arrow. Notifications are defined by individual users, so each user of Birst can set up and manage their own notifications.
Setting up notifications is a handy feature for dashboard viewers, especially for those who do not want to keep coming back to the dashboard regularly. Notifications allow viewers to have the information delivered to their email inbox instead.
Setting Up Dashboard Notifications
Notification for Entire Dashboard
To set up a notification for an entire dashboard, the dashboard viewer must first open the dashboard they want to schedule a notification for. Next, they must click on the megaphone icon located in the upper right-hand corner of the screen. Once the megaphone icon is clicked, the dashboard viewer must then click on the plus symbol to add a new notification. In step two, the notification must be given a name, and the email addresses of the recipients must be defined. Multiple email addresses can be added by separating them with a semicolon without any spaces in between. In addition, the title and message that will become the body and subject line of the email must also be defined. In step three, the frequency of the notification can be determined, which can be daily, weekly, or monthly. Details such as metadata, data refresh time, and applied filters can also be included in the email. The notification for an entire dashboard can only be delivered as a PDF attachment.
Notification for Individual Report
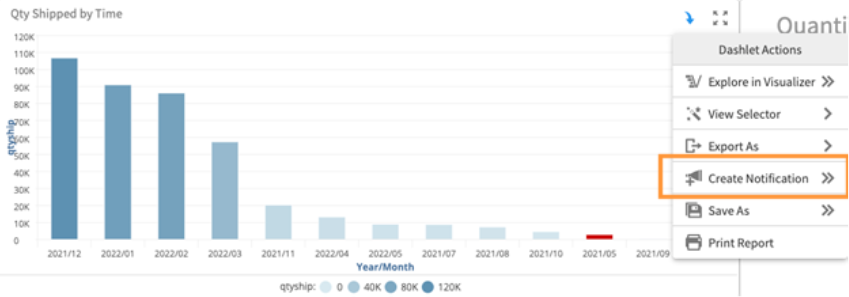 To set up a notification for an individual report, the dashboard viewer must hover their cursor over the dashlet they want to schedule a notification drop-down arrow will appear in the upper right-hand corner of the dashlet, which the viewer must click on to select "Create Notification." All the steps for defining the recipients, setting up the title and body of the email, and determining the frequency remain the same as for setting up a notification for an entire dashboard. The only difference is that the viewer can also determine the format of the attachment, which can be PDF, Excel, or a bulk Excel export for large tables of data.
Once notifications are set up, users have control over their own notifications and can amend them by clicking on the megaphone icon and selecting the drop-down arrow. Notifications are defined by individual users, so each user of Birst can set up and manage their own notification schedules.
Overall, dashboard notifications are a useful feature for dashboard viewers who want to receive information without having to regularly check the dashboard. By following the simple steps outlined above, users can easily set up notifications for either an entire dashboard or an individual dashlet and have the information delivered to their email inbox.
Customizing Notification Delivery
Dashboard notifications allow dashboard viewers to schedule the delivery of either an entire dashboard or an individual dashlet. The delivery of the dashboard or dashlet is sent by email, and within the email, there is an attachment that will have either the image of the dashboard or the dashlet. The dashboard viewer is also in control of how often the notification is scheduled for delivery and to whom the dashboard or dashlet is delivered.
To set up a schedule for an entire dashboard, the dashboard viewer opens the dashboard where they want to set up a notification and then clicks the megaphone icon that's in the upper right-hand side. Once they click the megaphone icon, they must first click the plus symbol to add a new notification.
In step two, the viewer gives the notification a name and defines either one email address or multiple email addresses for delivery. If there are multiple email addresses, they should be separated by a semicolon without any spaces in between each email address and the semicolon. The viewer then enters the title and the message that will become the body of the email as well as the subject line of the email.
In step three, the viewer determines how frequently the notification should run, and it can run daily, weekly, or monthly. They also have the option of including details, which includes metadata such as the data refresh time. It might also include any filters that were applied to the detail but information about the dashboard that the recipient might find helpful. For notifications of a dashboard, the only way to deliver that is by a PDF attachment.
To set up a notification for a dashlet, the dashboard viewer should go to the dashboard and then hover their cursor over the dashlet where they want to create a notification. Once they hover their cursor over the dashlet, they should see a drop-down arrow in the upper right of the dashlet where they can select create notification. All the steps of defining the recipients and setting up the title and the body of the email and the frequency all remain the same.
One additional thing that the viewer can do with a dashlet is to determine the format of the attachment. They can set up either PDF, Excel, or a bulk Excel export for large tables of data, for example. Once again, just like before, they can also include the details, which would include metadata.
Once users have notifications set up, they are in control of their own notifications. At any point, they can click on the megaphone again and then amend their notifications by using the drop-down arrow. Notifications are defined by the individual user, so each individual user of Birst can then set up their notifications and manage their notification schedules.
Managing Notifications
Editing Notifications
Dashboard notifications allow viewers to schedule the delivery of an entire dashboard or an individual dashlet. The delivery of the dashboard or dashlet is sent by email, and within the email, there is an attachment that will have either the image of the dashboard or the dashlet.
To set up a schedule for an entire dashboard, the dashboard viewer should open the dashboard where they want to set up a notification and then click the megaphone icon that's in the upper right-hand side. Once they click the megaphone icon, they must first click the plus symbol to add a new notification. In step two, they give the notification a name and define either one email address or multiple email addresses for delivery. If there are multiple email addresses, they should be separated by a semicolon without any spaces in between each email address and the semicolon. Then, they define the title and the message that will become the body of the email, as well as the subject line of the email.
In step three, they determine how frequently the notification should run, and it can be run daily, weekly, or monthly. They also have the option of including details, which includes metadata such as the data refresh time. It might also include any filters that were applied to the detail, but information about the dashboard that the recipient might find helpful.
Once users have notifications set up, they are in control of their own notifications. At any point, they can click on the megaphone again, and then they can amend their notifications by using the drop-down arrow.
Deleting Notifications
To delete a notification, the dashboard viewer needs to click on the megaphone icon, and then they can see their notifications here. They can select the drop-down arrow and then delete the notification.
For notifications of a dashboard, the only way to deliver that is by a PDF attachment. For notifications of an individual dashlet, the process is almost the same, with the exception of choosing the output format.
Managing notifications is a handy feature for dashboard viewers, especially for people who might not want to keep coming back to the dashboard on a regular basis. They can just set up their notifications and have the information come to them in their email.
Conclusion
Dashboard notifications are a useful feature that allows dashboard viewers to schedule delivery of either an entire dashboard or an individual dashlet. The delivery of the dashboard or dashlet is sent by email and within the email there is an attachment that will have the image of the dashboard or the dashlet. The dashboard viewer is also in control of how often the report or dashboard is scheduled for delivery and to whom the dashboard or dashlet is delivered to.
There are two ways to set up dashboard notifications, one way for the dashboard itself and one way for an individual dashlet. To set up a schedule for an entire dashboard, the dashboard viewer will open the dashboard where they want to set up a notification and then click the megaphone icon that's in the upper right-hand side. Once they click the megaphone icon, they must first click the plus symbol to add a new notification and then give the notification a name and define the email address or multiple email addresses for delivery. They can also set the title and the message that will become the body of the email as well as the subject line of the email. In step three, they determine how frequently the notification should run and it can be run daily, weekly, or monthly.
For notifications of a dashboard, the only way to deliver that is by a PDF attachment. To set up a notification for a dashlet, the dashboard viewer should go to the dashboard and then hover their cursor over the dashlet where they want to create a notification. Once they hover their cursor over the dashlet, they should see a drop-down arrow in the upper right of the dashlet where they can select create notification. All the steps of defining the recipients and setting up the title and the body of the email and the frequency all remain the same but one additional thing that can be done with a dashlet is to determine the format of the attachment.
Once users have notifications set up, they are in control of their own notifications. At any point, they can click on the megaphone again and then they can amend their notifications by using the drop-down arrow. Notifications are defined by the individual user so each individual user of Birst can then set up their own notifications and manage their own notification schedules.
Overall, dashboard notifications are a convenient feature for dashboard viewers who might not want to keep coming back to the dashboard on a regular basis. They can just set up their notifications and have the information come to them in their email.
Learn at your pace

Dragon Den is an Agile Dragon Group community focused on all aspects of Birst knowledge and development. Whether it is our free content or our paid training, we are here to support you throughout your Birst journey, from building your first dashboard to building your Birst solutions.

- Creating dashboards
- Creating reports
- Adding filters
- Manage user access